Monday, April 29, 2013

Craft Fair Display Set Ups

Frustration... a word that would not even begin to express how I felt trying to find videos, google images and even going to actual craft shows just to find the right set up for me.  It seemed more people focused on their actual crafts when doing tutorials on "setting up for a craft show" rather than actually setting up for a craft show.  

If you are going to set up for a craft show and do a YouTube tutorial on it, do not emphasize on everything else but what it is you should be focusing on.  One of my goals is to create a video on how to set it up.  After my experience in just trying to put up the tent, I realize that these tutorials are truly needed.  The worse thing to do is to try to set up for a craft show and not know what you are doing.  Thank god this has not happened to me because I am truly trying to do ALL of my homework first before getting involved.  

For starters, your displays for your crafts should be portable.  Anything that can easily be set up and dismantled is the way to go.  You should not have a set up that takes too much time to set up or that takes 10 people just to carry it in,  You will already have boxes filled with your merchandise so you do not need anything bulky that will take up more space than needed.  

This is what I recommend, keep in mind that my set up may be different from what your needs are because the items sold may be different... utilize your space.  Do not fill it with big tables and or multiple open boxes for people to rummage through.  Aesthetics is everything... when you are setting something up keep your atmosphere in mind, who are you catering too, what is the traffic flow going to be like, what do you have that will call the attention to someone who may simply be passing by.  Place the most eye catching color items in the most prominent spaces in your area.  The main objective is to gain the attention of your buyer.  Try not to overwhelm the space and if you do make sure that it is done in a way that is not too busy and make it flow.  

If you are going to have many items make sure your display cases, grid wires and or table all match in some way.  Too many different types of bins, boxes, table clothes, etc. will deter your buyer from coming in.  If you seem to be all over the place, people will not feel as though you are organized enough and maybe even feel too overwhelmed with your environment to even want to come to your booth.  Make sure you make signs for all your items... List the item to be sold and the price.  Try to elevate some of your items.  Having things on different eye levels is appealing.  When everything is laid flat there is a chance your one of a kind beautiful item you worked so hard on will be missed, all because it was not displayed correctly.  Color is important.  

When I purchased my display items, I bought everything in white and that includes my tent.  The added color comes in with the signs, and particular stand out merchandise as well as my tablecloth. Too much white or too much of any color is boring.  I plan on adding butterflies on my grid shelves just add that splash of color.  

Again.., I stress... I do not purchase anything without it being a great deal.  I finally found a store supply site that worked for me and I love it.  Not only were the prices great but the customer service was amazing from beginning to the end and I actually look forward to ordering other items from them more so because the service was amazing.  

People want to work with great people and friendly people.  Remember that when you are selling.  
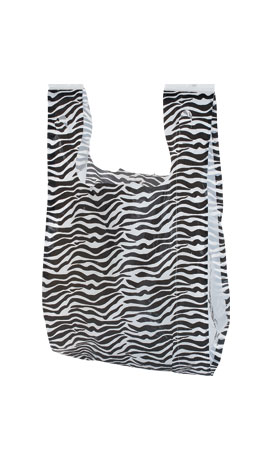
I purchased many items such as the zebra plastic bags.  It may sound funny but think of it this way... would you rather give your customer a regular white plastic bag or thank you bag or a bag that they will remember?  Think about that.  It is something so simple but you provided them with something that they were not getting in any of the other vendor booths.  You stand out and even with people walking in the vendor areas.  When your happy customers leave with the bag, other potential buyers will see them and wonder what it is and because the bag is so different they will look for the booth with that particular bag.  It stands out from the crowd and because of that you would get more buyers.  Be unique, it is something simple but makes a huge impact on your sales as well as your audience.  

 
I also purchased the grid standing unit with matching accessories.  It was the best thing because the grid you can utilize on both sides (front and back).  You can add as many peg hooks, shelves and/or baskets as you can fit and works for you.  Remember if you have to add a lot of items do it so it is pleasing to the eye.  Everything has to flow.  The reason why I purchased the grid unit is because it allows me to display many items in a small space and most of your craft area is a 10' x 10' grid so you have to use all your space wisely.  If you use your space with just tables you are just taking up too much room and the traffic jam within your space will deter other buyers from coming in not because you have many people in your space but because the space is so minimal for them to walk through they will not want to bother coming in.  


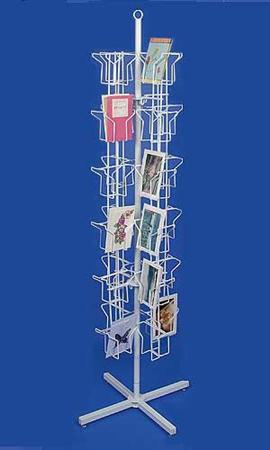
If you are selling cards, this is the best purchase you can make.  I bought it and I love it and saves so much space.  Every time I go to a craft show, I see card shows laying out every where and most of the time they are laid flat.  When I go it is not to purchase anything but to see the set up and the way in which the merchandise is being displayed.  Most of the time, it just doesn't seem to flow and sometimes people are afraid to start moving merchandise to go through it especially after you have set it up so nice.  Using this floor card holder works because they take the cards out and put them back and not worry if they are making a mess.  They can freely look through the rack without any worries from the seller.  Believe me your customers know that look sellers make when the potential customer is making a mess. 

If you really want to utilize your table space and add eye level you can use a grid unit which can be assembled to match your needs. The way it is set up in the picture would be too big to put on your table.  You literally build it from to fit your needs.  

Once I have everything ready to sell, etc.  I will provide you with an update to this blog by adding video tutorial and/or pictures as well as give you the status on how things went.  

Store Supply Warehouse has a catalog you can refer to.  The website is www.storesupply.com.  I want to make this very clear... every time I add a link does not mean I am working with the store or am getting any type of discount, etc.  If I like something and I feel it is great and works for me on a monetary level as well as a business aspect, I will post it because that is what I want this blog to be about.  I want to be able to get good deals for you, honest feedback from you, provide you with great tutorials and or important information and be of service to those who feel as I have... frustration all because you are in search of something and just can't find exactly what you need.  I do not want you to have to go through 101 different sites just to find what you need.  If you can't find something, ask me, my goal is to help my followers.  

I truly hope I have helped you in some way.  I know I do not have many photos up but the context I believe should be very helpful to you and if I am missing something, please let me know and I will update with more information.  

Sunday, April 28, 2013

My review on the EZ Pop Up Canopy 10 x 10 Commercial Fair Vending Tent 4 Walls White


http://www.ebay.com/itm/NEW-EZ-Pop-Up-Canopy-10-x-10-Commercial-Fair-Vending-Tent-4-Walls-White-or-Black-/280993751058?pt=LH_DefaultDomain_0&var=&hash=item416c88601

I just bought this and unfortunately I received it damaged but the seller so far has been very responsive and willing to do a refund and/or product placement with a free return.  I purchased it for $229.00 with free shipping.  It actually seems very durable.  I set it up to see if this product was worth keeping after receiving it damaged.  I will tell you 100% it is.  

It is a bit difficult to set up and it took me several tries to get it right in trying to position everything accordingly.  Just make sure everything adds up.  For instance.  When you are pushing out the frame to open up the tent, make sure the side with the two holes facing you is in the front.  That is where the awning inserts into.  When you are placing the top cover on, make sure that the EZ pop up label is on the sides not in the front or back.  You also need to make sure that the Velcro pieces on the top portion of the tent are in the front so that you can attach the awning to it.  This is important because when I tried to set this up everything I am telling you I did wrong.  I had to laugh at myself because I kept looking at it like what is wrong here and finally I figured it out.  

As for the wall panels, lets just say I am still trying to figure that out because when I tried to attach it, it just came out funny and not aligned right.  I really did not have time to take the time to figure it out but when I do, I will add to this post.  

I will tell you that it is difficult to build together and I felt like a football player at one point trying to snap everything into place.  I did become aggravated but I did it and again in the end it is worth it because from what I see it is durable and I cannot stress enough that it was perfect on a windy day.  As I was setting it up, the wind was picking up and tried to blow off the top but because of the straps it comes with to help hold it down, it did not blow off at all.  The side panels are held with Velcro as well both on the pole itself for the top and to be wrapped around the poles from top to bottom.  

I am going to sell a lot of light weight items so I need these walls to keep sturdy because if not all of my stuff will fly away and of course as a crafter that would be a nightmare.  The extra awning is great as well because it adds extra space to your unit and great for rainy days.  

I absolutely believe this is a great item but there is some difficulty to it.  This eBay purchase was the cheapest I found it.  I am a person who searches and searches and only buys only when I feel I have a great deal and if I feel I am not making out good with the item, it stays in the store.  No one is selling this item for less than $269 and if I remember correctly, shipping was not included.   

If you are looking for a tent, look no further.  Whether purchase it from this eBay buyer or anywhere else, this product is worth purchasing. 

Wednesday, April 3, 2013

Ikea $0.49 candle holder alteration

The candle holders I used for this project are from Ikea.  I have to say I love them and they are a great favor to use for weddings and to even use on the reception table at special occasions.  You can also create matching sets for your home to your liking.  The best thing about these is not only the price but the fact that they are reversible.  You can either use a tall skinny candle or a tea light with this candle holder.  LOVE IT and better yet, it cost only $0.49 each. 


On this project I used Wild Orchid Flowers (so reasonable in price and I loved pretty much all the flowers on the site.  I can't say I love them all because I have not bought them all.)  I also used some of the ribbon and flowers I purchased from save-a-thon.


As you can see this side up is for the skinny candles.  I designed this so that no matter which way you turn the holder, you still have a creative flare and you can appreciate your creativity (whatever style you can come up with).


I tried my best to match everything so that is one complete set.  


This side up is for the tea light as seen below. 


I added white glitter stickles to the outside edges of the flower.


Side view of the candle holder


Just to give you a different look, I want to show you pictures of the other set I did.  Keep in mind, these are my first two candle holder alterations.  I think they came out pretty good. 


The Rhinestone Ribbon I purchased on Ebay.  It was the 24 row, 1 yard of Green Ribbon.  I believed I paid less than $4.00 for this.  Personally if you buy the rhinestone ribbon on amazon (30 yards, 24 rows) it will end up coming out to cheaper.  Keep in mind this is the same exact style of the David Tutera ribbon sold at Michael's for over $10.00 which is absolutely ridiculous.  You are only paying for the name.  Do not get me wrong I am a fan of his but, I refuse to pay an outrageous price for something I can get cheaper.  I found the 30 yard, 24 row rhinestone ribbon for $11.00 on amazon and I bought it.  I LOVE it.  It is the same thing used at platinum style weddings or occasions.  Do you know what the difference is?  Instead of paying triple the amount of money to have someone else basically adhere it to a vase or whatever you have in mind, you pay the cost value and do it yourself and pay hardly nothing at all.  Save your money... go the DIY way.  Same affect, totally different cost. 


Do you have an idea you want to see come to life?  Share your ideas, maybe I can help you.  I would love to try to do my best to bring your ideas to life and help you do it in the process. 


Pushpin Holders using Michael's Tins and Ikea Jars

The best thing about crafting is being able to add your own touches to pretty much anything.  You can alter anything and make it your own to match the aesthetics of your environment.  

These are the first stick pin cushions I have ever made.  I had no idea what I was doing but I took my glue gun and imagination and went a little crazy.  I hope you love it. 

I bought the small canisters for the stickpin cushion holder at Michael's.  I used a 50% coupon towards this purchase.  The canisters are named Celebrate It - Square Favor Tins.  They come in a pack of 30 pieces.  I believe the price is either $19.99 or $24.99 (I can't remember which price it is).  Either way I paid 1/2 of the original price.  Again I stress, I am very big on savings and I could not picture myself paying the full price for this.  Just remember that you can use Joann coupons at Michael's.

I actually removed the top and glued it to the bottom of the can upside down.  You can actually have it as a shaker because when you attach it to the bottom there is a small space left where you can add some glitter or whatever you want to add to it.  I personally decided not to do that just because not many people are actually going to look at the bottom of the tin and if they do, it is to usually see how it is made.  I used fiber fill for the cushion and wrapped a piece of material around it and tied it together with a rubber band.  I was not really a fan of using the rubber band technique so I am going to try something else for next time.  I just felt it became too much of a hassle for me.   Since you need some type of weight at the bottom, I used marbles and glued it to the inside of the tin then hot glued gun the material cushion down to it.  

The rest as you can see was just decorated it with ribbon and flowers. I did not use paper for this project at all.  In some videos I saw many people using card stock but I felt the ribbon looked a lot better and I was able to play with different types of trimming.  

The flowers I bought in a bulk package at the save-a-thon warehouse sale in Harlem, New York, for a $1.00.  That was the BEST deal because it came in a huge package.  The ribbon I purchased for I believe it was $1-1.50 per yard at the save-a-thon store on Myrtle Avenue in Brooklyn.  

When I shop for crafts, I travel anywhere and everywhere to get a good deal, especially if it is something I really love. 


I wanted to show you different styles of pushpin holders.  The below shows you that you can pretty much use any type of jar including baby jars.  I have not used a baby jar yet but that is the next goal.  


As you can see, I wanted to show you the before and after.  The tin is simple and plain.  You can do whatever type of style you want... shabby chic and steampunk seem to be the most popular styles from what I have been noticing.  


I purchased these jars at Ikea.  They came in a pack of 4 for $3.99.  I think it was a great deal and I can use it for anything.  I love the fact that it is pretty much like a screw top and you can lean it to the side.  The only problem with that is in unless you put weights in the jar or something heavy inside, you have to be careful with just how heavy you make the top.  If it is too heavy, your jar will basically topple over and it will not hold.  As you can see, I made this one top heavy so unfortunately, I cannot use this jar on its side.  I can only use it in the upright position.  

One of the reasons why I want to do these blogs is not to show you pretty things, but to explain to you the simple mistakes we can do when trying to do our crafts.  I do not want to paint a picture that crafts are pretty simple and easy.  We are all going to make mistakes.  It's just good to know what those mistakes may be ahead of time or what you need to look out for when beginning your craft project.  

The three pushpin holders shown, are the first ones I have done EVER.  Considering they are my first ones, I can't complain.  I learned and now I know what not to do.  

For instance... huge lesson learned... DO NOT USE flannel fabric when doing this project.  When I started the flannel material below faded and looked warn out.  I did not like that.  The pictures of the pink and black pushpin holder have a different material.  The material used on that was cotton and what a difference it made.  Always use cotton fabric if you can.  I can't really say too much on other fabrics because I have not used anything else so far.  When I do, I will update this blog and upload the new images as I have with several of my other blogs.  


If you have any suggestions or comments, please share your thoughts with me.